Integration testing tools ensure that different components of your software, like APIs, databases, and third-party systems, work together without issues. Picking the wrong tool can lead to unreliable tests, wasted resources, and slower feedback cycles. Here’s how to choose the right one:
- Define Your Needs: Identify integration points (e.g., APIs, databases) and prioritize workflows that are high-risk or critical to your business.
- Check Compatibility: Ensure the tool supports your tech stack (languages, CI/CD pipelines, platforms) and integrates seamlessly.
- Evaluate Usability: Choose a tool that matches your team’s skills and has an intuitive interface for quick adoption.
- Test Scalability: Confirm the tool can handle larger test suites, parallel execution, and high loads as your needs grow.
- Assess Reporting & Security: Look for detailed analytics, customizable dashboards, and strong compliance features like encryption and role-based access control.
- Compare Costs: Calculate the total cost of ownership, including setup, training, and maintenance, not just the license fee.
- Run a Trial: Conduct a proof-of-concept to test the tool’s performance on your workflows before making a final decision.
Pro Tip: Tools like Selenium, Postman, and TestComplete offer different strengths, from open-source flexibility to enterprise-level automation. Use platforms like BizBot to compare options tailored to your budget and technical needs.
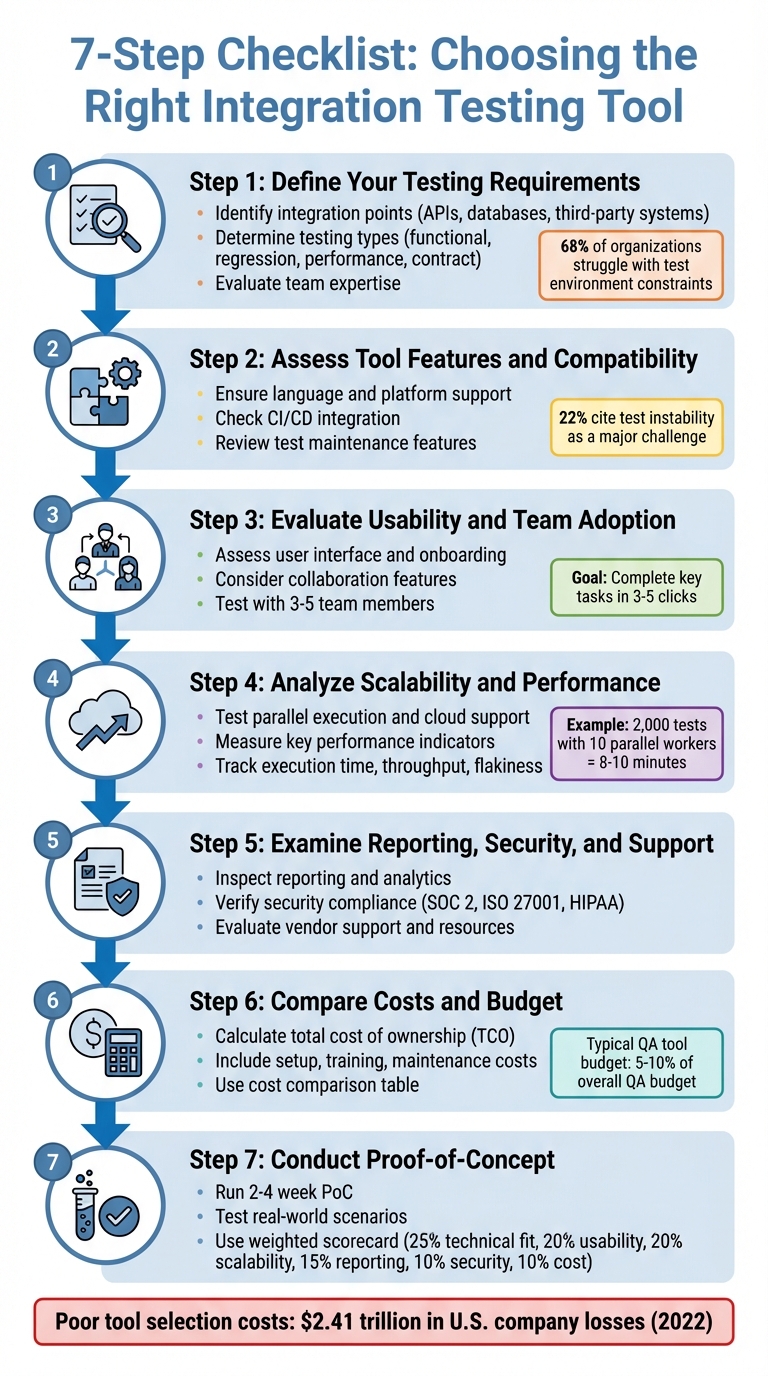
7-Step Process for Choosing Integration Testing Tools
What is Integration Testing?
Step 1: Define Your Testing Requirements
To kick things off, map out your application's architecture to identify where different components interact - these are your integration points. Think of these as the "meeting spots" where systems exchange data. For example, this could include REST APIs linking your frontend to backend services, database connections, third-party payment gateways, messaging queues, or external tools like CRMs and email platforms. According to the World Quality Report, about 68% of organizations struggle with test environment and data constraints during integration testing, so solid planning here is critical. Defining these needs upfront will guide you in picking the right integration testing tool.
Identify Integration Points
Make a detailed list of every component in your system that exchanges data. Take an e-commerce app, for instance - your shopping cart API might need to sync with an inventory database, the checkout process might connect to payment platforms, and order confirmations could trigger email notifications. Don’t forget third-party services like payment processors, analytics tools, or marketing platforms. These are often prone to issues and need specific test coverage. Create an "integration inventory" that includes component names, interface types (like REST endpoints or database schemas), data flow directions, and dependencies such as authentication services or message brokers.
Determine Testing Types
Choose your testing approach based on your system's needs and business priorities. For instance:
- Functional testing ensures components work together as intended, like verifying that an order updates inventory and triggers payment processing.
- Regression testing checks that updates to one part don’t disrupt others.
- Performance testing gauges response times and throughput under realistic traffic loads, especially for high-demand systems.
- Contract testing is ideal for microservices, ensuring services stay compatible as they evolve independently.
Focus on workflows that are both high-risk and high-value to your business.
Evaluate Team Expertise
The tools you select should align with your team's skill set. For teams with limited coding experience, look for low-code platforms that offer user-friendly interfaces, record-and-playback options, and strong documentation. On the other hand, if your team has solid programming skills, more advanced frameworks with robust CI/CD integrations might be a better fit. To make this decision, conduct a quick skills audit - survey your team about their familiarity with programming languages, automation tools, and CI/CD systems. This ensures you choose tools that fit their expertise without overcomplicating the process. Once you've nailed down your testing requirements, you're ready to dive into evaluating tool features and compatibility.
Step 2: Assess Tool Features and Compatibility
Once you’ve outlined your testing requirements, the next step is to ensure the tools you're considering align with your technology stack. Start by confirming the tool supports the programming languages and platforms your team relies on. For instance, if your backend is built with Java using Spring Boot and your frontend is powered by React, the testing tool must seamlessly handle both. Similarly, verify that it supports the operating systems (Windows, Linux, macOS), browsers (Chrome, Edge, Firefox, Safari), and mobile platforms you use. Tools like Selenium and Postman are good examples of options that offer broad compatibility for web and API testing.
Another critical factor is how well the tool integrates with your CI/CD pipeline. Check for native plugins or CLI support, and ensure it can run tests in headless mode with outputs that machines can easily process. Run pilot workflows to confirm that integration tests complete within your desired timeframe - let’s say 15–20 minutes. This will give you a clear picture of how the tool fits within your existing CI/CD processes.
Lastly, look into features that simplify test maintenance. Tools with self-healing locators, data-driven testing, and centralized data management can significantly reduce the time spent on upkeep. Features like robust failure analytics and well-documented REST APIs or SDKs also make it easier to integrate the tool into your workflows. This is especially important considering that 22% of companies cite test instability - often caused by brittle scripts and poor CI/CD integration - as a major challenge.
Ensure Language and Platform Support
Start by listing all the languages, frameworks, and platforms your application uses, and confirm that the tool supports them out of the box. For example, if your application includes Python microservices with Django and Node.js services using Express, make sure the tool integrates smoothly with popular test frameworks like PyTest or JUnit without requiring complex workarounds. Also, review the tool’s documentation to check for support of API styles (such as REST, GraphQL, or gRPC), message brokers (like Kafka or RabbitMQ), and databases (like PostgreSQL, MySQL, or MongoDB). Testing a few real-world integration scenarios in your staging environment can help ensure compatibility.
Additionally, confirm support for your preferred IDEs. Tools with high-quality plugins for popular editors like Visual Studio Code or IntelliJ can make adoption easier and improve day-to-day workflows.
Check CI/CD Integration
Request examples from vendors or during a trial that demonstrate how the tool integrates into a CI/CD pipeline. For instance, ask for a sample Jenkinsfile, GitHub Actions workflow, or GitLab CI configuration that shows integration tests running automatically on pull requests. Make sure the tool supports triggering tests via the command line or API, provides exit codes to fail builds when tests fail, and handles environment variables for managing secrets and configurations. Verify that it can run tests in headless or containerized modes for consistent execution in CI environments. Also, look for native plugins or marketplace actions provided by the vendor to simplify setup.
Review Test Maintenance Features
Choose tools that minimize the effort needed to maintain your test suite. Features like self-healing locators can automatically adjust to minor changes in UI attributes or endpoint names, reducing the need for frequent script updates. Data-driven testing and centralized test data management are also valuable, allowing you to make a single update without modifying numerous test cases. Tools with clear failure analytics can help you quickly identify whether an issue stems from environmental factors, dependency outages, or actual regressions - saving you time during troubleshooting.
Other helpful features include modular test design, reusable components (like PyTest fixtures or Postman collections), and text-based configurations that work well with version control systems. Together, these capabilities make it easier to evolve your test suite alongside your codebase.
Step 3: Evaluate Usability and Team Adoption
Once you've confirmed a tool's compatibility with your systems, the next step is to assess its usability. A tool that’s easy to use is more likely to be embraced by your team. Focus on how well it supports key workflows, such as creating, running, debugging, and reporting integration tests. Ideally, these tasks should be completed in just 3–5 clicks. Conduct hands-on testing with team members by assigning them tasks like creating and running an API test within 10 minutes. Track their success rates and note any errors along the way. A user-friendly tool not only streamlines workflows but also encourages collaboration and quicker adoption.
To gauge onboarding efficiency, test the tool with 3–5 representative team members - such as a developer, QA engineer, SDET, and a product-focused engineer. Provide them with only the official documentation and tutorials, then measure how long it takes to complete essential tasks like installing the tool, connecting it to CI, and writing and running three integration tests. Record metrics like time-to-first-test success, the number of support questions asked, and any rework needed due to misunderstandings. Tools with built-in guidance, templates, and well-structured documentation tend to minimize onboarding time and reduce errors.
Assess User Interface and Onboarding
A clear and intuitive user interface (UI) can make or break the user experience. Check if the UI simplifies essential tasks like setting up environments, configuring test data, and integrating with CI pipelines. Look for features such as step-by-step guides, API and SDK references, troubleshooting sections, and sample projects tailored to your tech stack. Tools that include contextual help, wizard-driven test creation, prebuilt CI examples, and sample test suites can significantly ease the learning curve.
Consider additional resources like video tutorials, instructor-led training, or certifications that can support your team’s enablement programs. To evaluate usability, create a scorecard that tracks metrics such as time-to-first-valuable-test, the number of support requests during the pilot phase, and the percentage of team members actively using the tool after 30 and 90 days. Use a simple 1–5 rating scale to assess subjective aspects like UI clarity and documentation quality. Written feedback from pilot users can provide deeper insights into areas for improvement. A well-designed interface should not only make individual tasks easier but also encourage seamless teamwork.
Consider Collaboration Features
Collaboration is a key factor when choosing an integration testing tool. Look for features like shared workspaces, role-based access control (RBAC), dashboards, test commenting, and integration with issue trackers like Jira. RBAC is particularly important for regulated industries in the U.S., as it allows you to control who can edit tests versus who can only view results. Shared dashboards provide a centralized view of integration test statuses, enabling developers, QA engineers, and product owners to stay aligned without frequent meetings. Tools that automatically create or update defects in issue trackers based on test failures can further streamline workflows.
Make sure the tool’s collaboration features align with your team’s software development lifecycle (SDLC) and communication practices. For example, if your team uses Git-based workflows, ensure the tool supports version control for tests and integrates with pull request reviews. If Slack or Microsoft Teams is your primary communication platform, verify that the tool can send notifications about failed tests to the appropriate channels. For distributed teams working across time zones, prioritize tools with asynchronous collaboration features, such as commenting, review workflows, and persistent dashboards, as these can better support remote work compared to tools designed for co-located teams.
Step 4: Analyze Scalability and Performance
When choosing a testing tool, it’s not just about ease of use - it also needs to handle growth effectively. As your testing demands increase, the tool should manage larger test suites, more complex environments, and higher user loads without slowing down. This means evaluating how well the tool scales alongside your business and infrastructure.
Begin by setting a baseline. Measure how long your current test suite takes to execute, the CPU and memory it uses, and the failure rates. Then, gradually increase the load - double the number of tests, add more data, and run more concurrent executions. Keep an eye on whether execution time increases proportionally or becomes unmanageable. Run these tests in common U.S. cloud regions like AWS us-east-1, Azure East US, or GCP us-central1 to ensure the tool performs reliably under real-world conditions. If it maintains speed and stability as the load grows, you’ve got a scalable solution.
Test Parallel Execution and Cloud Support
Parallel execution is critical for keeping test cycles short as your suite expands. Make sure the tool supports running multiple test cases or suites simultaneously across threads, containers, or agents, rather than processing them one by one. For instance, running 2,000 tests with 10 parallel workers can cut execution time from an hour to just 8–10 minutes, saving time and speeding up feedback loops.
Set up the tool to allocate resources based on priority. For example, dedicate more capacity to smoke tests on your main branch while assigning fewer resources to lower-priority tests. Ensure the tool integrates well with your CI server - whether you use Jenkins, CircleCI, or another platform - so it can automatically spin up multiple parallel jobs without manual effort.
Cloud and hybrid support is just as important. Check if the tool is available as SaaS, self-hosted, or both, and confirm it works with major providers like AWS, Azure, and GCP. Features like Docker containers, Kubernetes orchestration, and autoscaling are essential for handling fluctuating demands. If your infrastructure is a mix of on-premises and cloud systems, verify that the tool can securely coordinate tests across both environments using VPNs, VPC peering, or secure tunnels. To test this, run a proof-of-concept that spans multiple locations - for example, with the test controller in one cloud region, some services on-premises, and others in a different cloud. This will help you identify any latency or stability issues early on.
Measure Key Performance Indicators
To truly understand how well a tool scales and performs, track specific key performance indicators (KPIs). Start with execution time per suite or build - monitor how long test suites like smoke tests or regression tests take to complete. Watch for trends over time to catch any slowdowns. Measure throughput, or the number of tests completed per hour or day, to see if the tool can handle your workload efficiently.
Keep an eye on pass/fail rates and flakiness. Flaky tests - those that fail due to tool or environment issues rather than actual defects - can indicate the tool struggles under load. Track resource utilization efficiency by measuring how much CPU and memory each test consumes when running in parallel. This shows whether the tool optimizes your infrastructure or wastes resources. Also, measure environment setup time - the time it takes to prepare containers, databases, and test data for each run. A slow setup can undermine even the fastest test execution.
Finally, use these metrics to estimate the tool’s return on investment (ROI). Compare costs like licensing fees (in USD per month or year), cloud compute charges, and implementation time against savings from reduced manual testing, shorter CI pipeline times, fewer production issues, and faster time to market. Monitor your change failure rate to see if better testing leads to fewer hotfixes and rollbacks. These improvements contribute to more efficient CI pipelines and a smoother testing process overall.
sbb-itb-d1a6c90
Step 5: Examine Reporting, Security, and Support
After confirming performance and scalability, it's time to dig into how the tool handles reporting, protects your data, and provides user support. These elements are key to getting the most out of your integration testing tool.
Inspect Reporting and Analytics
A good reporting system should make it easy to identify which integration failed, where it happened, and why. Look for customizable dashboards that allow you to filter by service, environment, or test suite. For example, you should be able to separate API integration tests from UI tests. The tool should also group failures by integration point and connect tests to logs, screenshots, or API traces for better context.
During the proof-of-concept phase, run a small, realistic test suite to evaluate the tool's reporting capabilities. Can you quickly identify failed tests, pinpoint their environment, and understand the cause without digging through raw logs? The best tools offer timeline views of failures across multiple builds with filters for microservices, environments (like dev, staging, or production-like), and test suites. On the other hand, weaker tools may only provide a basic list of passed and failed tests with limited details.
Choose tools that track defect trends, code or integration coverage metrics, and release-based reporting. This allows stakeholders to monitor test health for each build or sprint. Look for analytics features like mean time to detect (MTTD) and mean time to resolve (MTTR) for defects, flaky test detection, and pass rate comparisons over time to catch regressions. Ensure the tool can export reports in common formats like PDF, CSV, or JSON for audits or executive summaries. Role-based views are another helpful feature, enabling engineers, QA managers, and executives to access the level of detail they need. Clear, insightful reporting is a foundation for assessing overall tool reliability before diving into security.
Verify Security Compliance
Your chosen tool must meet strict security standards. Look for encryption (TLS 1.2 or higher), RBAC (role-based access control), audit logging, and compliance with certifications like SOC 2, ISO 27001, HIPAA, or PCI DSS. Features like SSO/SAML, MFA, and data residency options are also critical, depending on your requirements.
Request a recent SOC 2 or ISO 27001 report (under NDA if needed) and review the vendor's security whitepaper. Ask about data storage locations, incident response protocols, and backup/retention policies. If the tool is cloud-based, confirm that the cloud provider also holds relevant certifications and that the vendor has a clear data processing agreement that aligns with U.S. regulations.
A secure tool should offer granular RBAC, allowing you to set project- or environment-specific permissions and restrict access to sensitive test suites. It should also include secrets management, ensuring API keys and passwords are stored securely in an encrypted vault rather than plain-text scripts. Integration with external secret stores is a plus. Additionally, features like data masking or tokenization for sensitive information - such as Social Security numbers or credit card details - are essential. This ensures that sensitive data doesn’t appear in logs, screenshots, or database dumps.
Evaluate Vendor Support and Resources
Reliable support can make or break your experience with a tool. Look for documented SLAs that specify response times, such as one hour for critical production issues. The vendor should offer multiple support channels, including email or ticketing, live chat, and ideally phone or video support for urgent problems. A clear incident communication process and status page are also valuable for managing outages. U.S.-based teams may prefer vendors with support hours aligned to U.S. time zones or "follow-the-sun" support models.
Comprehensive documentation is equally important. This includes API references, step-by-step guides, troubleshooting playbooks, and architecture patterns. Up-to-date docs with version histories, "getting started" guides for common setups, video tutorials, and sample projects can significantly reduce onboarding time. A strong community ecosystem with active forums, Q&A archives, community-built plug-ins, and webinars is also useful for finding practical solutions to complex issues, especially for hybrid setups involving legacy and cloud systems.
When comparing vendors, directories like BizBot can help you assess documentation and support quality. Use these tools to filter for testing or DevOps solutions and then ask vendors specific questions. For example, request to see dashboards from a typical microservice integration pipeline or ask for a report export in PDF format for executive use. For security, inquire about certifications, encryption practices, and support for SSO and MFA. For support, ask about SLA options, response times during U.S. business hours, and any onboarding or migration assistance they offer. BizBot can provide a quick overview, but digging into these details will reveal whether a tool's reporting, security, and support truly meet your needs and align with U.S. regulatory standards.
Step 6: Compare Costs and Budget
When choosing a tool, balancing technical needs with budget constraints is crucial. Once you've confirmed the technical features you need, it's time to ensure the costs align with your financial plan. But don’t just focus on the subscription fee - look at the total cost of ownership (TCO). A thorough evaluation includes costs like setup, maintenance, and scalability limits. Here's how to break down and calculate TCO effectively.
Calculate Total Cost of Ownership
TCO goes beyond the upfront license or subscription fees. Start by listing the initial costs, which may vary based on pricing models (e.g., per user, per project, or per execution minute). For instance, Postman’s Team plan starts at $12 per user per month (billed annually), while open-source tools like Selenium, JUnit, or Apache JMeter have no license fees. However, "free" tools often come with hidden costs for implementation and maintenance. For example, setting up cloud infrastructure for parallel test runs could cost $0.10 to $1.00 per hour per instance.
Next, consider training and onboarding expenses. This includes internal training time and any paid vendor sessions or certifications. For U.S.-based teams, onboarding costs can range from $500 to $5,000 per team, depending on the required hours. Then, factor in ongoing maintenance costs like tool updates, script adjustments for changing APIs or UIs, and infrastructure upkeep - often 10–20% of the annual license fee. If the tool offers optional add-ons (e.g., advanced reporting, security features, or integrations), include those as well. Finally, don’t forget support costs, such as premium service agreements, dedicated account managers, or consulting fees.
Cloud usage, billed hourly or per virtual user for load tests, and long-term contract discounts can also impact TCO. To compare tools effectively, create a TCO worksheet in a spreadsheet. Include rows for license fees, infrastructure, training, maintenance, and support, and columns for Year 1, Year 2, and Year 3. For example, Tool A might cost $15,000 annually for 10 users plus a $5,000 one-time onboarding fee, while Tool B costs $9,000 yearly but requires $8,000 annually in DevOps time for custom infrastructure. Over three years, Tool B could end up costing more despite its lower initial price. Use U.S. labor rates - typically $75–$120 per hour for senior QA or DevOps engineers - to quantify time spent on maintenance and debugging.
Hidden costs like test flakiness (which eats up engineering hours), integration challenges, and insufficient support can add up. To identify these early, ask vendors about typical maintenance overhead for similar U.S. customers (e.g., hours per week per 100 tests). Running a proof-of-concept to log actual time spent on setup and maintenance can also help. Additionally, check for limits on API calls, project counts, or concurrent runs that could lead to unplanned upgrades. Sometimes, a higher-priced SaaS tool may save time and reduce long-term costs compared to a free alternative.
Use a Cost Comparison Table
A cost comparison table can simplify the decision-making process. List tools in columns and categorize costs and limits in rows, such as:
- License model (per user, per seat, per run, or open source)
- Base annual price in U.S. dollars
- Number of included users
- Execution limits (e.g., parallel sessions or test runs per month)
- Infrastructure needs (on-premises vs. cloud SaaS)
- Training and support options (documentation only, standard, or premium)
- Monthly maintenance effort
For free or open-source tools, the license cost may be $0, but other rows like setup, scripting, and maintenance often carry higher values. A detailed table can highlight the trade-offs, showing that "free" tools might require more resources to maintain.
Include scaling breakpoints in the table, such as costs for 5, 10, 25, and 50 users, additional charges for extra parallel executions, and storage tiers. Also, note price changes when upgrading from standard to enterprise plans. Adding a projected "cost at 2× and 5× current test volume" line helps teams see how expenses grow as testing scales across CI pipelines, microservices, and API suites.
| Tool | Pricing Model | Key Cost Factors | Free Tier Available |
|---|---|---|---|
| Selenium | Free (open-source) | Setup, maintenance, CI/CD integration | Yes |
| Postman | Freemium ($0–$12+/user) | API tests, mock servers, collaboration | Yes |
| TestComplete | Paid (trial available) | Cross-platform UI/API testing, reporting | Trial only |
| Tricentis Tosca | Paid (enterprise) | Scriptless automation, end-to-end testing | No |
| JUnit/TestNG/PyTest | Free (open-source) | Framework plugins, expertise | Yes |
To match tool costs with your QA budget, first decide what percentage of the overall QA or engineering budget can go toward tools and infrastructure - typically 5–10% of the QA budget. Then, calculate an acceptable annual spend range and compare each tool’s one-year and three-year TCO within that range, factoring in headcount growth and increased automation. Aligning subscription or license terms with fiscal-year cycles and modeling multi-year discounts or upfront payments can help manage budgets and cash flow.
When negotiating contracts, experienced QA leaders suggest validating usage patterns during a proof-of-concept to avoid over- or under-purchasing. Ask vendors for transparent pricing on additional users and executions, and negotiate multi-year "price lock" agreements to prevent unexpected hikes. It’s also wise to request references from similar-sized U.S. companies to benchmark typical costs and support levels. Finally, include clear exit clauses and data export guarantees to avoid excessive costs if switching tools becomes necessary. Tools like BizBot, which compare software options, can help businesses avoid redundant spending and ensure tools align with budgets. Similarly, QA leaders can use software testing directories to benchmark costs and identify tools that fit their financial and technical needs before diving into deeper evaluations.
Step 7: Conduct Proof-of-Concept and Make the Final Selection
Once you've narrowed down your options and compared costs, the next step is to run a 2–4 week proof-of-concept (PoC). This phase allows you to test your shortlisted tools under real-world conditions. Focus on key integration flows like core APIs and database interactions, and establish clear success criteria. These might include metrics such as first test time in your CI pipeline, average execution time, and flakiness rate. During this period, ensure you have vendor support for setup and troubleshooting. Simulate real-world scenarios to thoroughly validate the performance of each tool.
Run Real-Scenario Tests
During the PoC, prioritize scenarios that are both high-risk and high-frequency. For example, test cross-service workflows such as order → payment → notification, integrations with external APIs or payment providers, and processes tied to essential business functions like checkout or sign-up. Don't overlook edge cases - network latency, partial failures, bad payloads, and rollback logic can reveal weaknesses in error handling, retry mechanisms, and synchronization. Critical workflows like sign-up, billing, and subscription cancellations should be tested rigorously, with metrics such as setup time, the number of flows automated, pipeline duration, and flaky failure rates tracked closely.
To assess scalability and parallel execution, gradually increase the number of tests running concurrently in your CI pipeline. Measure throughput (tests per minute), resource usage, and the tool's ability to handle concurrency challenges like shared test data or rate-limited APIs. If the tool supports cloud execution, test in U.S.-based regions to evaluate latency and cost implications. Intentionally introduce failures - such as misconfigured endpoints or bad data - and monitor how quickly engineers can trace issues back to their source. Ensure the tool provides aggregated logs, payloads, and stack traces, and integrates with your bug tracker. Use a mix of quantitative data (execution speed, failure rates, maintenance effort) and qualitative feedback (ease of scripting, clarity of reports, team satisfaction) to score each tool effectively.
Use Directories Like BizBot
After gathering test data and team feedback, use scoring tools to finalize your decision. Transition from trial results to a final choice by employing a weighted scorecard. Assign specific percentages to each evaluation criterion based on your earlier priorities. For example:
- 25% for technical fit (stack, protocols, CI/CD)
- 20% for usability and adoption
- 20% for scalability and performance
- 15% for reporting and analytics
- 10% for security and compliance
- 10% for total cost of ownership
Populate this scorecard with data from the PoC - metrics, incident examples, and stakeholder feedback - rather than relying solely on subjective opinions. Set "must-have" thresholds, such as compatibility with your CI pipeline, support for your primary programming language, or keeping test flakiness below a specific percentage. Eliminate any tool that fails to meet these critical requirements.
To streamline comparisons, use curated directories like BizBot. These directories centralize information on pricing models, contract terms, and integration testing features. BizBot is particularly helpful for U.S.-based teams, offering tools with intuitive interfaces and transparent pricing in USD, catering to businesses of various sizes. Include input from cross-functional stakeholders - QA, developers, DevOps, and product leadership - when scoring each tool. Balance technical fit with overall business impact instead of focusing solely on license costs. This structured process ensures your final selection is based on solid data and team consensus, paving the way for successful implementation and long-term benefits.
Conclusion
Selecting the right integration testing tool requires careful consideration of your specific needs, budget, and the skill level of your team. Start by clearly defining your integration points, the types of tests you'll perform, and the system requirements. This groundwork helps avoid costly mismatches that can lead to inefficiencies and system instability.
For instance, poor CI/CD integration has been linked to test instability rates as high as 22%, contributing to a staggering $2.41 trillion in losses for U.S. companies in 2022 alone.
Keep in mind that even feature-rich tools can fall short if they’re too complex for your team to adopt effectively. Choose tools that align with your team’s capabilities, focusing on those with intuitive interfaces, comprehensive documentation, and built-in collaboration features. When evaluating costs, go beyond the price tag - factor in expenses like infrastructure, training, maintenance, and scaling over the next two to three years. A tool that seems affordable at first might prove costly if it requires constant manual intervention or doesn’t scale well with your needs.
Before making a final decision, conduct a proof-of-concept to validate your choice. Test challenging integration scenarios, such as multi-service workflows or third-party API interactions, and measure key metrics like test execution time, flakiness rates, and setup effort. A weighted scorecard that evaluates technical compatibility, usability, scalability, reporting, security, and cost can help you make a more informed, data-driven decision rather than relying on subjective impressions.
If you’re a U.S.-based business aiming to simplify your search, platforms like BizBot can be invaluable. BizBot offers a curated list of integration testing tools with transparent pricing in USD and options tailored for small businesses and growing companies. By following these steps, and using resources like BizBot, you can find a tool that scales with your business as your integration needs become more complex.
FAQs
What should I look for to ensure an integration testing tool works well with my tech stack?
When choosing an integration testing tool, the first thing to look at is its compatibility with your current tech stack. Does it support the programming languages you use? Can it integrate seamlessly with your tools, APIs, and platforms like Windows, macOS, or Linux? These are critical questions to answer.
Beyond compatibility, think about the tool's ease of use and whether it can grow with your needs. A tool that's scalable ensures it can handle increasing demands as your projects expand. Also, check out the vendor support - reliable support can save you from headaches down the road. Lastly, ensure the tool aligns with your system's architecture and meets your organization's tech standards to avoid unnecessary issues.
What should I look for in an integration testing tool to ensure it scales with my growing needs?
When choosing an integration testing tool that can grow with your needs, look for options built with a scalable architecture, automation features, and the capacity to handle larger test volumes without performance issues. Tools offering cloud-based solutions, modular setups, and comprehensive reporting are especially well-suited to meet increasing demands.
It's also smart to choose tools that support smooth updates and integrations, so they remain aligned with your evolving business and testing requirements.
What security features should you prioritize when selecting an integration testing tool?
When selecting an integration testing tool, it's crucial to focus on features that enhance security and compliance. Data encryption is a must-have to protect sensitive information, while user access controls help prevent unauthorized access. Tools with audit logs are also valuable, as they let you monitor system activity and maintain a clear record for transparency. Make sure the tool supports secure API protocols, like HTTPS, to ensure safe communication between systems. Lastly, check if the tool complies with industry standards such as GDPR or SOC 2, which are key for meeting data protection requirements. These elements work together to protect your systems and preserve trust in your processes.