Managing user access can get overwhelming as teams grow. Role-Based Access Control (RBAC) simplifies this by assigning permissions to roles (like Admin or Viewer) instead of individuals. This approach improves security, reduces errors, and makes audits faster. Here's what you need to know:
- RBAC Basics: Roles group permissions (e.g., "edit task"), which users inherit when assigned to roles. Higher roles can include lower-level permissions.
- Preparation: Identify users, resources, and actions. Create a permission matrix linking actions to resources.
- Setup Process:
- Define roles and assign permissions (e.g., Read, Write, Approve).
- Assign roles to users or teams for efficiency.
- Configure access levels and restrictions (e.g., private projects, role hierarchies).
- Testing: Use tools to simulate changes and verify permissions align with the "least privilege" principle.
- Maintenance: Regularly audit roles, monitor logs, and update permissions as needed.
RBAC helps ensure users only access what they need, reducing risks and improving team collaboration.
Preparing to Set Up Role-Based Permissions
Understanding RBAC Basics
Role-Based Access Control (RBAC) is all about linking permissions, roles, and users in a structured way. Here's how it works: Permissions represent specific actions like "view task" or "approve invoice." Roles are collections of these permissions, designed to match job responsibilities. Finally, users are the individuals assigned to these roles, gaining the permissions that come with them. Think of roles as job descriptions translated into access rules.
If a user has multiple roles, they inherit the combined permissions from all assigned roles. For instance, someone with both "Project Manager" and "Billing Viewer" roles will have access to everything allowed by both roles. Many systems also include role hierarchies, where higher-level roles (like "Senior Designer") automatically include the permissions of lower-level roles (like "Designer").
"RBAC is the bridge between a chaotic security posture and a mature GRC program. You cannot manage risk or compliance effectively if you haven't first mastered access control." – Payal Wadhwa, Senior Content Marketer, Sprinto
To avoid "role explosion" - a situation where too many overly specific roles clutter the system - stick to four to six core roles that address the needs of about 80% of your users. Handle the remaining 20% of edge cases separately to keep things manageable.
Once you're clear on the RBAC basics, the next step is gathering the information you'll need to set up permissions effectively.
Gathering Required Resources
Start by identifying who needs access and what they need access to. Build a user inventory that lists active users, their job titles, and their departments. Then, create a catalog of all protected resources, such as projects, tasks, files, financial records, time logs, and databases.
You'll also need admin credentials to access the "Roles and Permissions" section of your platform. Have your organizational chart handy to understand reporting structures, and document any existing user groups, like "US Delivery Team", to make bulk assignments easier.
Next, create a permission matrix - a detailed map that links every action (like view, create, edit, delete, or approve) to the relevant resources. This "verbs and nouns" list will act as your blueprint for setting up roles. Before finalizing the roles, consult department heads to ensure permissions are appropriate and don’t grant unnecessary access.
Once you've gathered this information, you'll be ready to start configuring role-based permissions. This preparation ensures a smooth process for defining and assigning roles in your cloud-based project management tool.
sbb-itb-d1a6c90
Role-Based Access Control (RBAC) Explained: How It Works and Why It Matters for Security
Step-by-Step Guide to Configuring Role-Based Permissions
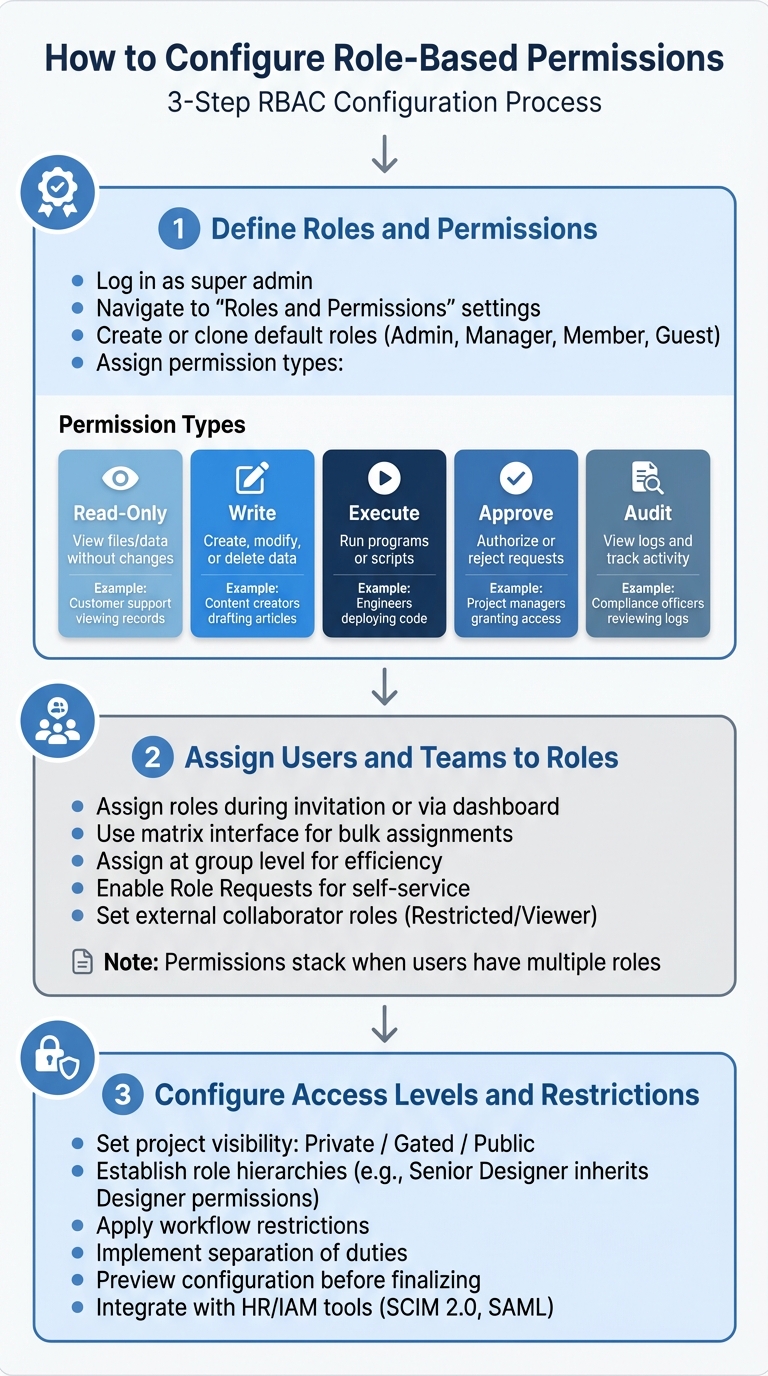
3-Step Process for Configuring Role-Based Access Control (RBAC)
Step 1: Define Roles and Permissions
To get started, log in to your cloud-based project management tool as a super admin. Head over to the "Roles and Permissions" or "Access Control" section in the settings menu. Here, you'll find a list of existing global roles and the permissions currently in place.
Begin by either creating new roles or tweaking the default ones like Admin, Manager, Member, or Guest. These default roles are a great starting point since most platforms allow you to clone them and make adjustments without impacting the originals. Make sure each role is named clearly to reflect its purpose.
"Setting well-defined user roles and permissions ensure that users only have access to the features and data necessary for their roles." – Bizman
Next, assign specific permissions to each role. Permissions typically include actions like "Read-Only", "Write", "Execute", "Approve", or "Audit." To keep things organized, group permissions by feature category, such as time tracking, task management, or source code access. Be aware that some permissions are interdependent - like needing "View" permissions before enabling "Edit."
| Permission Type | Description | Example Use Case |
|---|---|---|
| Read-Only | View files or data without making changes | Customer support viewing records |
| Write | Create, modify, or delete data | Content creators drafting articles |
| Execute | Run programs or scripts | Engineers deploying code to testing |
| Approve | Authorize or reject access requests | Project managers granting document access |
| Audit | View logs and track system activity | Compliance officers reviewing access logs |
When creating new roles, take advantage of the cloning feature. Cloning an existing role gives you a pre-built template to work from, saving time and reducing the risk of overlooking critical permissions.
Once your roles are defined, you're ready to assign them to your team members.
Step 2: Assign Users and Teams to Roles
Now it’s time to assign roles to users and teams. This can be done during the user invitation process or by editing profiles through the management dashboard. For quicker updates, many platforms offer a matrix interface that lets you assign roles to multiple users at once.
For larger teams, assigning roles at the group level is far more efficient than managing individual users. For example, if you assign a role to a team like "Marketing Team" or "US Delivery Team", any new members added to that group will automatically inherit the correct permissions. This approach saves time and ensures consistency.
"Space roles empower those working in a space to delegate responsibilities and permissions without requiring the intervention of Jira admins." – Atlassian
Keep in mind that permissions often stack. If a user has multiple roles, they’ll have access to all the privileges associated with those roles. For example, someone with both "Project Manager" and "Billing Viewer" roles will have the combined permissions of both.
Consider enabling Role Requests so team members can request roles themselves. Administrators can then approve or reject these requests. For faster onboarding, you can even set certain roles to be granted automatically upon request. For external collaborators like clients or consultants, assign roles like "Restricted" or "Viewer" to limit their access to specific data or folders.
Once roles are assigned, it's time to fine-tune access levels and restrictions to maintain security.
Step 3: Configure Access Levels and Restrictions
To control visibility, set project access levels. Most platforms offer options like "Private" (accessible only to members), "Gated" (open to members and select external users), or "Public" (visible to everyone). Choose the level that balances your collaboration needs with security.
Establish role hierarchies to simplify permissions management. For instance, a "Senior Designer" role can inherit all permissions from the "Designer" role, reducing redundancy.
Apply workflow restrictions to ensure only authorized roles can move tasks through specific transitions. Similarly, resource controls can be applied at a global level, per project, or even down to individual files or folders.
To avoid conflicts of interest, use separation of duties. For example, don’t let the same person both request and approve a budget. This reduces the risk of errors or fraud. Before finalizing, preview your configuration to verify how external stakeholders will see and interact with the system.
For larger organizations, integrating your role-based access control (RBAC) system with HR tools or Identity and Access Management (IAM) platforms can streamline operations. Standards like SCIM 2.0 and SAML can help automate user provisioning and deprovisioning, saving time and reducing manual errors.
Testing and Maintaining Role-Based Permissions
Testing and Verifying Permissions
Before rolling out any role changes, thorough testing is a must. Many cloud platforms provide tools like a Policy Simulator or "Test Changes" feature. These tools let you preview how updates will impact permissions without affecting actual users. This way, you can see whether access will be granted, denied, or remain unchanged - without risking sensitive data exposure.
To ensure everything aligns with the Principle of Least Privilege, use the "Check Access" feature. This tool allows you to confirm a user's specific permissions for an item, ensuring restricted views and access controls are functioning as intended.
When testing, always clone existing roles instead of modifying them directly. This approach lets you experiment with changes in isolation, safeguarding live roles from unintended updates. Additionally, before deleting any role, reassign all collaborators to avoid creating access gaps that could disrupt workflows or lock users out of necessary resources.
| Testing Method | Description | Security Benefit |
|---|---|---|
| Policy Simulator | Models "allow" policies to predict access changes | Prevents over-permissioning before deployment |
| Role Cloning | Duplicates a role for safe modification and testing | Protects live roles from configuration errors |
| Access Check Tool | Verifies user permissions for specific items | Ensures the Principle of Least Privilege is upheld |
| Audit Log Review | Tracks role changes and membership updates | Detects unauthorized escalations or permission drift |
Monitoring and Auditing Roles Regularly
Once roles are set up and verified, keeping them secure requires ongoing attention. Regular audits are key to preventing "permission drift", where users gradually accumulate more access than necessary. Start by reviewing the roles management page to see all active roles and their permissions, ensuring they still align with your organization's current needs.
System audit logs are invaluable for tracking changes like when collaborators are added or removed, roles are updated, or admins gain access to sensitive projects. To make this process smoother, grant auditors permissions like "Administer Projects" so they can view project-specific logs and pinpoint who made changes and when.
Group membership changes are another area to monitor carefully, as they can instantly alter access levels. Tools designed to optimize site management can help identify and clean up outdated roles or memberships.
For larger organizations, AI-driven troubleshooting tools can be a game-changer. These tools analyze permission setups, highlight potential security gaps, and even explain why a user has - or doesn’t have - specific access. This can save significant time compared to manual investigations.
Finally, minimize the number of users with system-wide administrative privileges to reduce the risk of accidental misconfigurations. During audits, pay special attention to the distinction between global permissions (platform-wide) and space-specific permissions (project-level) to ensure no one has excessive authority across the board.
Best Practices for Secure Collaboration
Building on the foundation of role-based permissions, following these practices can further strengthen security and streamline operations.
Using the Principle of Least Privilege
The Principle of Least Privilege (PoLP) ensures that users only have access to the resources needed for their specific tasks.
"The principle of least privilege states that identities should only be permitted to perform the smallest set of actions necessary to fulfill a specific task. This balances usability, efficiency, and security."
Start by assigning read-only access as the default for all new users. Additional permissions should only be granted when a clear business requirement is identified. This approach minimizes the risk of users accumulating unnecessary privileges over time.
For tasks requiring elevated access, implement Just-In-Time (JIT) permissions. These provide temporary, time-limited access that automatically expires once the task is completed.
To further safeguard your systems, use "Deny" assignments or permission boundaries to block risky actions - like deleting critical databases - regardless of other permissions a user might hold.
Automate access changes by linking your RBAC system to your HR database or identity provider. This "Joiner-Mover-Leaver" automation ensures that permissions are updated promptly when employees are hired, transferred, or leave the organization.
Finally, document all role definitions and permissions to ensure secure and auditable collaboration.
Documenting Roles and Permissions
Clear and detailed documentation is essential for maintaining long-term security. Without it, troubleshooting, explaining access decisions, or passing audits becomes unnecessarily difficult. Create a Job Role Matrix and a permission matrix that outline each role, its purpose, the specific permissions included, and the actions allowed (e.g., viewing tasks, editing deadlines, approving invoices, or deleting files).
Include a brief, one-sentence description for each role to help new administrators quickly understand its purpose. For instance: "QA Lead can view all test cases, edit test results, and comment on bugs but cannot approve releases." This kind of clarity prevents confusion as your team expands.
Be mindful of role inheritance and enforce Separation of Duties to avoid conflicts. Using consistent naming conventions - like avoiding overlapping terms such as "Dev Team" versus "Developer" - can also prevent role sprawl and confusion.
Conduct formal access reviews every 6 to 12 months to ensure permissions remain appropriate. Document these reviews and remove any outdated access. If exceptions are granted, such as access to a sensitive file, record the rationale, the responsible owner, and a review date for when the exception should be reassessed.
Payal Wadhwa, Senior Content Marketer at Sprinto, highlights the importance of documentation in achieving broader security objectives:
"RBAC is the bridge between a chaotic security posture and a mature GRC program. You cannot manage risk or compliance effectively if you haven't first mastered access control."
Conclusion
With this guide, you're equipped to implement RBAC in a way that strengthens security and streamlines collaboration in cloud-based project management tools and administration software. By clearly defining roles, assigning users thoughtfully, and applying precise access controls, you can establish a framework that grows with your organization. This approach speeds up onboarding, minimizes errors, and simplifies audits by focusing on a manageable set of roles rather than scattered individual permissions.
"By limiting resource access based on employee roles, RBAC effectively reduces unauthorized access across your organization. It enforces the principle of least privilege, ensuring users have only the permission necessary for their job functions".
To keep your RBAC system effective, regular maintenance is essential. Schedule quarterly reviews of elevated roles and sensitive group memberships to identify and remove inactive accounts or outdated privileges. These reviews prevent permission creep and ensure your system aligns with current business needs.
FAQs
How do I choose the right roles without creating too many?
When setting up roles, it’s smart to begin with the pre-configured roles included in your project management tool. These roles come with predefined permissions, saving you time and effort. Roles act as bundles of permissions that define what actions users, groups, or service accounts can take on various resources.
Most tools typically provide three types of roles:
- Basic roles: These grant broad access and are often used for general management tasks.
- Predefined roles: These are tailored for specific tasks or needs, offering a more focused set of permissions.
- Custom roles: If the pre-configured options don’t meet your needs, you can create roles that are customized to fit your exact requirements.
Starting with these built-in roles simplifies the process and helps avoid unnecessary complexity in managing permissions.
What should I include in a permission matrix?
A permission matrix is a straightforward way to outline user roles and their corresponding permissions. Here's what it typically includes:
- Roles: These are security profiles, such as admin or member, that dictate general access levels.
- Permissions: These specify the exact actions users can take, like creating, editing, or deleting items.
- Access Levels: This defines what users are allowed to view or modify within a project or organization.
By using this framework, you can maintain secure and well-structured collaboration.
How often should I audit and update RBAC roles?
Regularly auditing and updating RBAC roles is an important step in maintaining both security and proper access control. Experts recommend reviewing these roles either quarterly or every six months. Why? Because outdated permissions can linger, creating potential security risks.
Frequent updates are particularly crucial in fast-changing environments, like cloud infrastructure, where roles and permissions can shift rapidly. Including systematic access reviews and attestations as part of your RBAC strategy ensures tighter control and reduces the chances of permission sprawl.